
As mentioned in my overview post for April, I am designating the weekends this month to planning out all our outdoor projects for the summer. The first project I am tackling is our front walkway, which encompasses the area between the front porch and the driveway. It is currently fabricated from interlocking stones (pavers?) and there is also a flower bed section where some humongo hostas grow. I have BIG plans for this area of our yard!
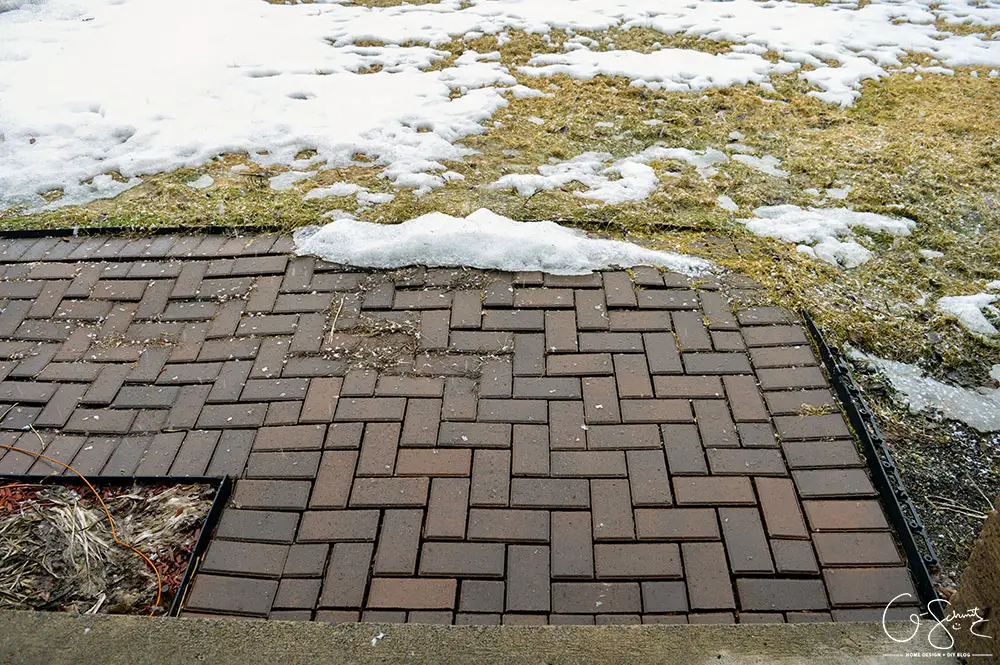
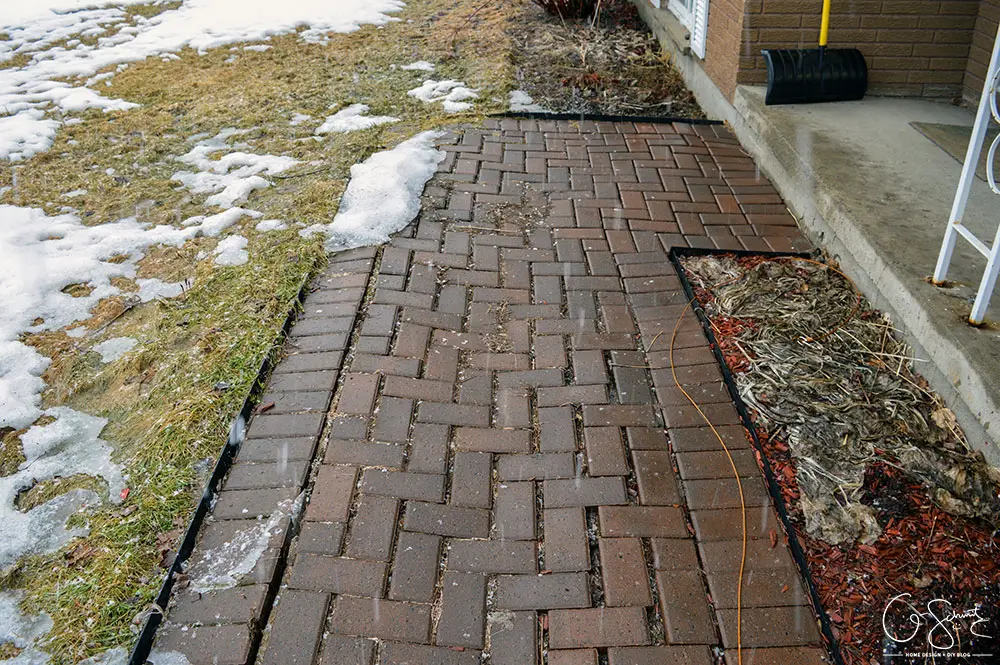
Don’t be fooled by the bleak photos that I took when it was snow/raining, as soon as those plants start growing in it does look a little bit better! But you know what doesn’t look good? The fact that the paving stones are uneven, separating in sections and there are weeds growing between them. Last summer I sprayed some stuff to kill the weeds, but they keep coming back! I also don’t like the pavers at all in the winter time, because my shovel gets stuck on the edges whenever I try and remove the snow.
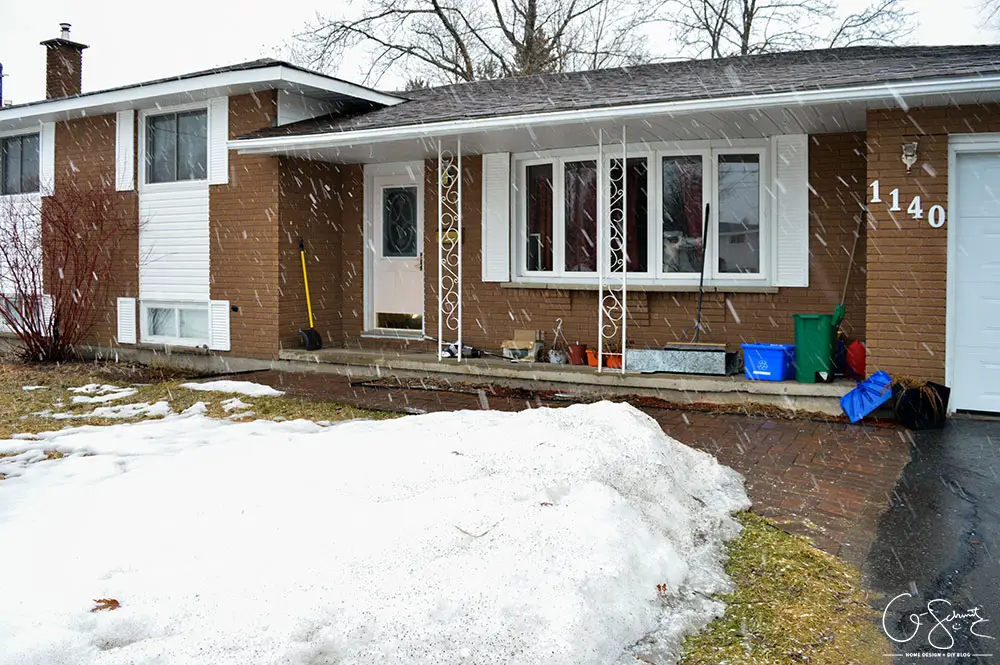
For some reason, this winter our porch became a catch-all area for stuff (aka garbage). I have no idea why there is half the stuff as there is now, but I hope that once we clean up the garage this summer (update: we did clean the garage), all this stuff will have a designated spot (or just be thrown out). We have two areas where the snow tends to build up, and that’s on the right corner, where the driveway, walkway and grass area meet, and on the left corner, in front of the door. That second spot seems to be where the snow falls off the roof when it’s windy; and our walkway always gets smaller as the winter gets longer.
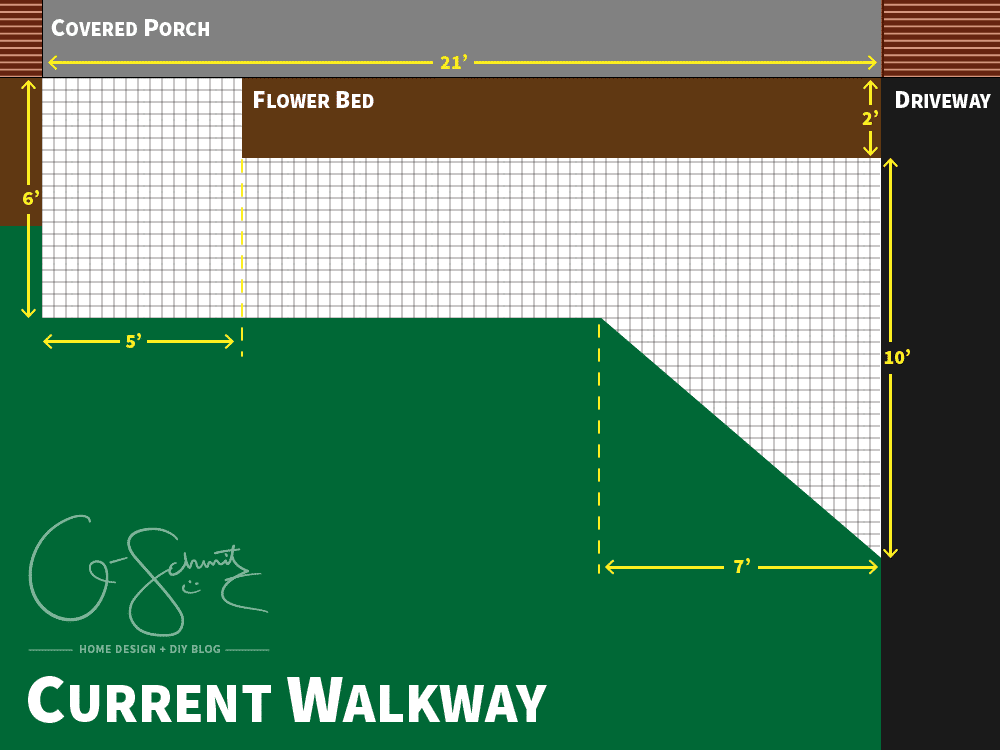
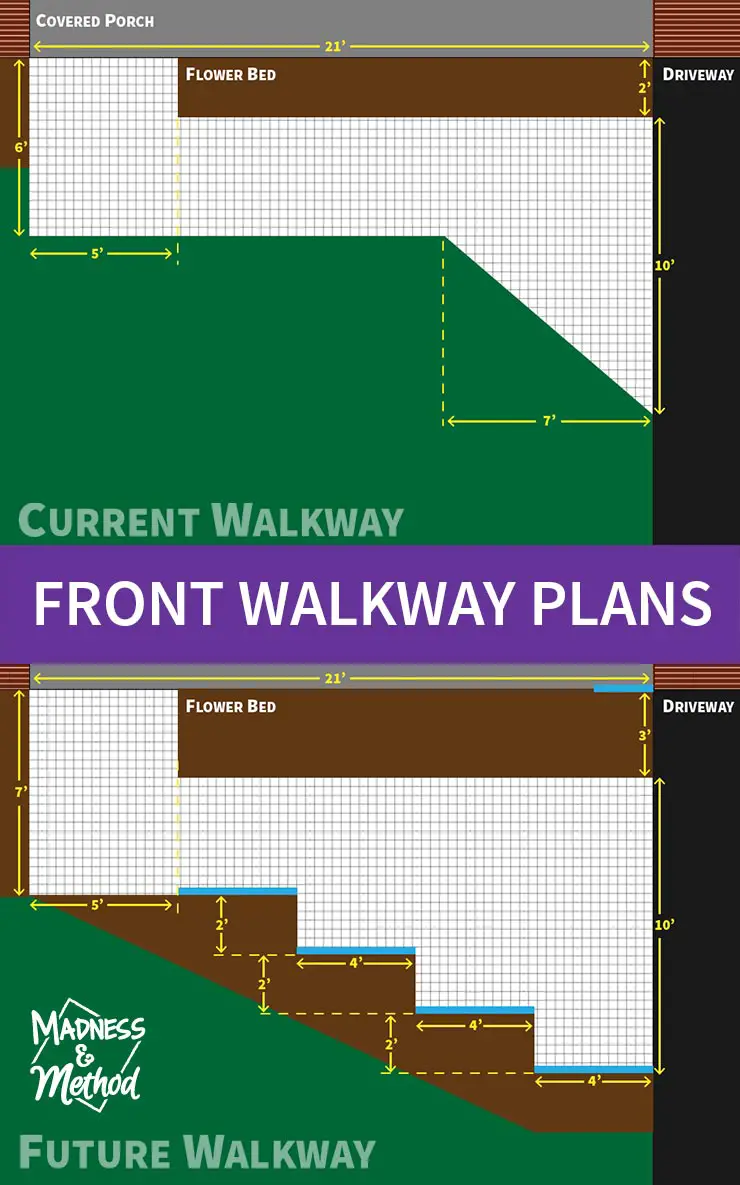
While it was snow/raining yesterday, I went out and took all the measurements, drew it out on graph paper, then planned what the new design would be. I had the idea already, I just didn’t have exact dimensions to work off of. This morning, I transferred my drawings to the computer and added some colour and labels. In the graphic above, you can see how our current walkway is designed, and for some reason there’s a strange diagonal section. It does come in handy when you park there, so you can actually step out onto the walkway and not the grass, but I don’t really like the weird jutted out angle.
We were originally planning on doing poured concrete forms, like we did on a portion of our backyard, but this angle part was making that planning difficult (sorry I don’t have a picture of the backyard part I am talking about, it is still covered 100% in snow – You can sort of see the area here, in the 3rd photo down). I had gotten the idea from Pinterest, and then found out that Lee Valley carried the actual concrete forms to pour into. We also bought the concrete mixing bucket to go with the mould, but it broke after doing a few forms (the Husband rented a concrete mixer to finish it, and it worked much better). Now, I think we will go with a full concrete walkway, and then maybe use the form to do a stamped look.
Update: We finished the concrete walkway!
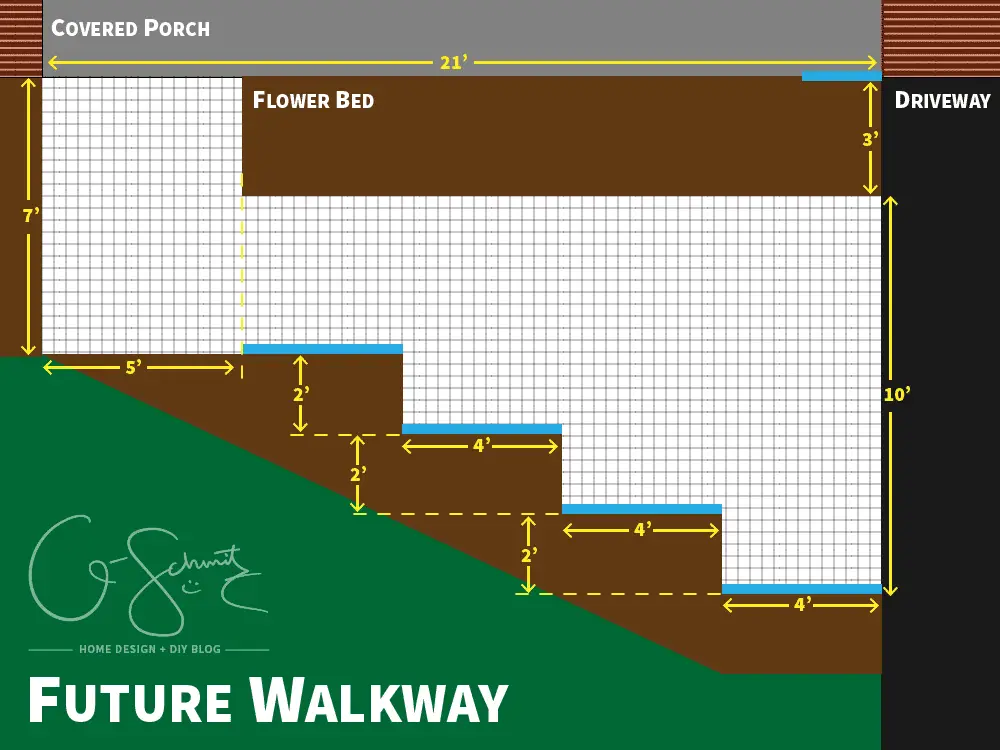
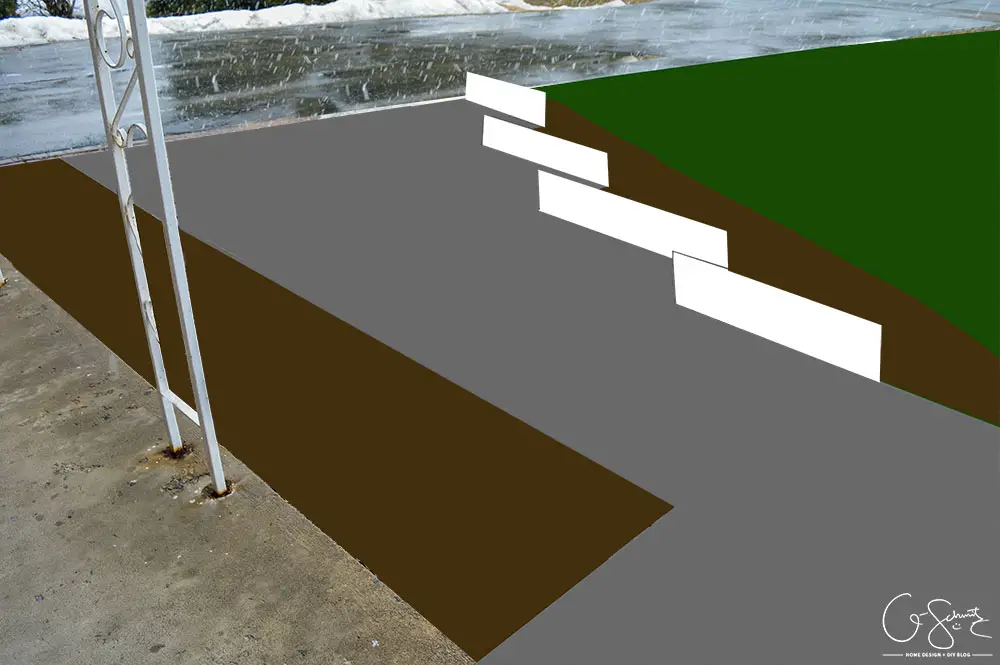
Anyways, my idea is to build out a geometric “step” pattern for the main walkway, and then have a flower bed on the other side as well. The blue sections in the graphic above represent little trellis walls that I want to make to add height and definition to the walkway, and serve as a backdrop for some plants (they will measure 4′ wide by 1′ tall). The trellis along the porch is where I will make a cover to hide our green and recycling bins (2′ wide by 4′ tall). In this design, I’m also extending the current flower bed out a foot, because the hostas literally expand crazy big in the summer and take up that much space anyways. I’m also hoping to gain a bit of extra space for the winter time to put snow (oh the joys of landscaping in Canada!).
Update: We completed this concrete walkway
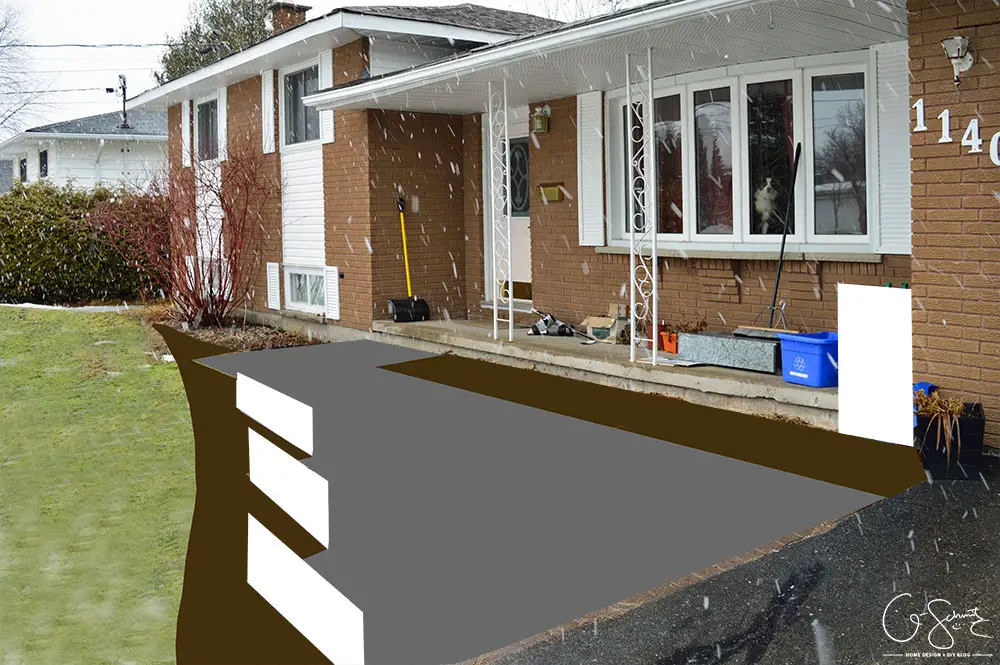
I quickly edited some photos to show how I was thinking about the space in 3D view (and yes, I did remove a bunch of snow from these pictures!). I didn’t have enough time this morning to make super realistic images, but at least they kind of show what I am talking about (the white parts are the trellis sections). For some reason this photo (above) only shows three in the front… but it should actually be four.
Update: Here is what the mini-trellis fences look like.
This new design would keep the similar shape of the walkway, but would eliminate the strange angle.
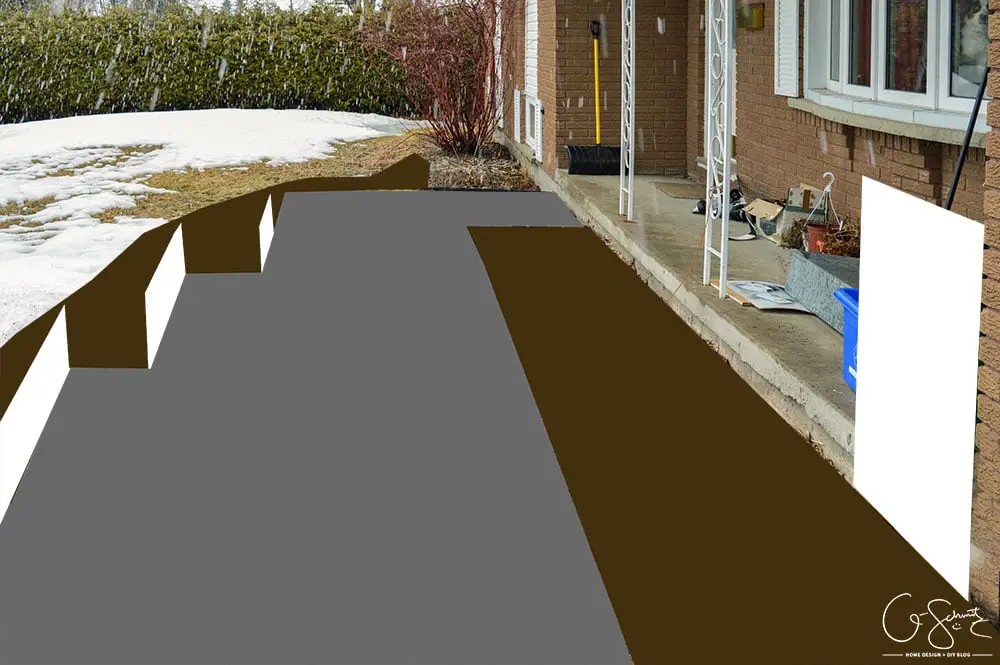
Guess what else I thought of? You could probably just push the snow through the open sections in the wintertime and continue to have a nice big walkway! I am planning on keeping the trellis’ in all year-round, so hopefully they don’t get destroyed in the winter from the weight of the snow. Did you also notice the little Tootsie doggie staring at me through the bay window? She was very confused as to why I was taking pictures outside (without her of course!).
And so that is the plan for the walkway! The Husband said he prefers it like it is… but I’ve had enough of pulling weeds, getting my shovel caught in the cracks and walking precariously on this potential tripping hazard. Even if we do end up going with something more basic and plain (ie: a straight concrete walkway), at least it will be an improvement on what we currently have. I’m also planning on keeping all these stones and using them as edging for other flower beds… I just can’t wait for summer to get here!
What do you think, is the new design an improvement? Am I missing something that should be included? I’d love to find out in the comments!
No Comments