
I wanted to give a behind-the-scenes look at how I come up with the content for this website, and figured I’d include some handy Blog Writing 101 style tips! Maybe you’ve always wanted to start a blog, have found a topic you’re passionate about and would love sharing, but you need some logistics on where to start. Just remember the 5 Ps :)
Now, if you didn’t know this about me, I started a “hobby style” blog many moons ago (you can check it out here). I didn’t post consistently (although I did try at the end!) and I kind of talked about whatever I felt like at the time. I was actually going to write this post on that site, but considering I haven’t posted there in a couple of years – felt like it might make more sense to share it here instead!
I don’t go into the nitty-gritty details of how to actually start a blog (ie: buying a domain name, getting hosting), more like the 5 basic elements that every blog should have!
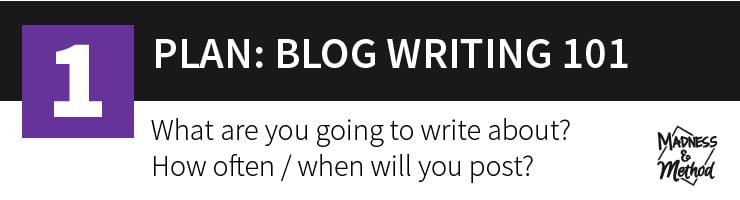
Plan
Personally, I find it best to have a set schedule of when I’m going to post (so far it’s twice a week, once on Tuesdays and once on Saturday mornings), that way I can hold myself accountable and get content out regularly. I don’t think I would be nearly as disciplined if I just kind of posted as I wanted (maybe four posts one week, and zero the next) but it depends on the person/blogger to determine what they can commit to.
How do I decide what to write about?
If I’m working on a renovation or a room makeover, I’ll plan out the project and then break down the blog posts in a logical/chronological way. I try to break each blog post into a manageable topic, and it’s hopefully something I haven’t covered before. I use Google Calendar for this, and I’ll add a daily event and name it whatever I’ll be talking about. This works really well when I’m planning far in advance because I can input the posts each week and then work out the details later. For example, I might know that I’m going to talk about a big renovation (like my brother’s kitchen) and I can block off one day a week each month for a different post. Then I’ll look at the whole project, and break things down that way. Other times, I may be working on something as it happens in real life (like a One Room Challenge); although since I’m pretty organized when working on the project, I can usually estimate what I’ll be working on each week.
For smaller projects, on non-DIY posts, I have a list written down of “potential” topics to cover, and I try to get to them when I have time. I usually keep these for my Saturday posts, which are more lifestyle-focused, and that’s why I’m talking about blogging today!
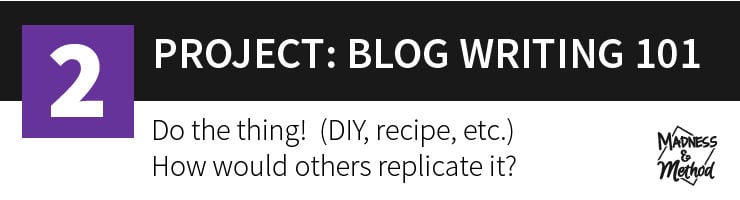
Project
I’m a DIY blogger, which means I actually have to do a DIY project in order to write about it! For food bloggers, the “project” might mean making a recipe, for fashion, it could be going shopping and trying on different outfits. Basically, this is the “meat” of what you cover, and will often take the most amount of time. (For example, drywall patching is a time-consuming project that could take days to do, while smaller builds or makeovers may only take a few hours).
Either way, I need to make sure to plan out time in my schedule (and make sure I have all the supplies, whatever), in order to do the actual project. For bigger renovations, this may also mean coordinating with outside contractors (or making sure the Husband is home to help me with something!). Are you doing something outside? Weather will be a big factor, so try not to rush the projects and push them to the last minute! A lot of times, I may also be working on a few projects at once (usually during the Mister’s nap time), and I do find it easier that way.

Pictures
In order to blog about DIY projects, especially when I’m sharing a tutorial on how to do something, I need to stop and take pictures! This is always handy when I have a helper, although the Husband complains sometimes when I am taking pictures of him working and not “helping” him haha… “Pictures” also involves the process of actually taking them off of the camera and editing them, and for small things, might even take more time than the actual project!
I edit all my photos in Adobe Photoshop, make sure to add a watermark, include a Pinterest image with a caption and name them in order so they help tell a story or explain the project better. No matter how you edit your photos, make sure they are sized correctly for your blog (ie: 500 pixels wide) AND that the file size isn’t too large (ie: > 100kbs).
Some bloggers may also use stock photography; just remember that you have the proper rights to use a photo before you publish it on your blog. PHOTOS YOU FIND ON GOOGLE OR PINTEREST ARE NOT FREE TO USE! Sorry I had to write that in caps, but it’s a really important issue and you do not want to violate copyright.
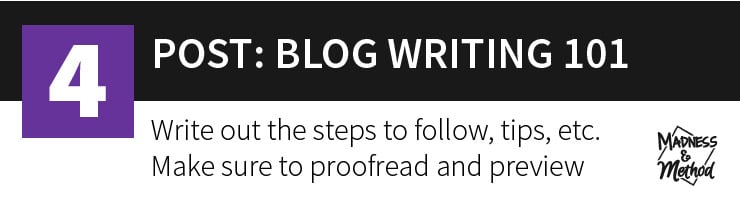
Post (and Preview / Proofread)
This involves the writing part! Sometimes, it’s easy to come up with the text because I can just follow along with my photos and go over everything I did in a DIY. I find that I get pretty wordy, so it’s always a challenge for me to kind of edit back and just include the basics :) I also like to proofread the text in Word and/or Grammarly, just to make sure I don’t have any typos. For the most part, I feel like I don’t have issues with spelling, but a lot of times I’ll write the completely wrong word or add in some extra ones that make everything more confusing. I’ll blame the fact that French is my first language and sometimes things are a little backwards :)
I also need to add in some custom code including no-pin codes to some photos, nofollows for affiliate links, etc. I will often preview my post to make sure everything looks in order, then I either post right away (which is the majority of time) or schedule the post for a date in the future (when I’m really on the ball, but that usually only happens if I know I’m going to be away on vacation or something!).
Promotion
This is the “make it or break it” part of blogging. Experts say you should spend 5x more time promoting a post than actually writing it… and I definitely fall short on that aspect. As soon as I post something (or shortly after), I’ll usually share it out to Facebook, then save it to my Madness and Method blog posts Pinterest board. I try to mention each post on Instagram (either before I write it like a “sneak peek” or a few days after) – I also have my Instagram photos auto-post to Facebook.
A few weeks later, I’ll re-share the post as an image on Facebook, and I’ll re-pin it on Pinterest to different boards. For seasonal content, like Halloween projects, I might hold off on sharing it too much until the next year, but for other things, I may share it anytime.
I send out a bi-monthly newsletter, so I make sure to include my latest posts in there in case someone has missed it. You can sign-up for my email newsletter here if you wanted to!
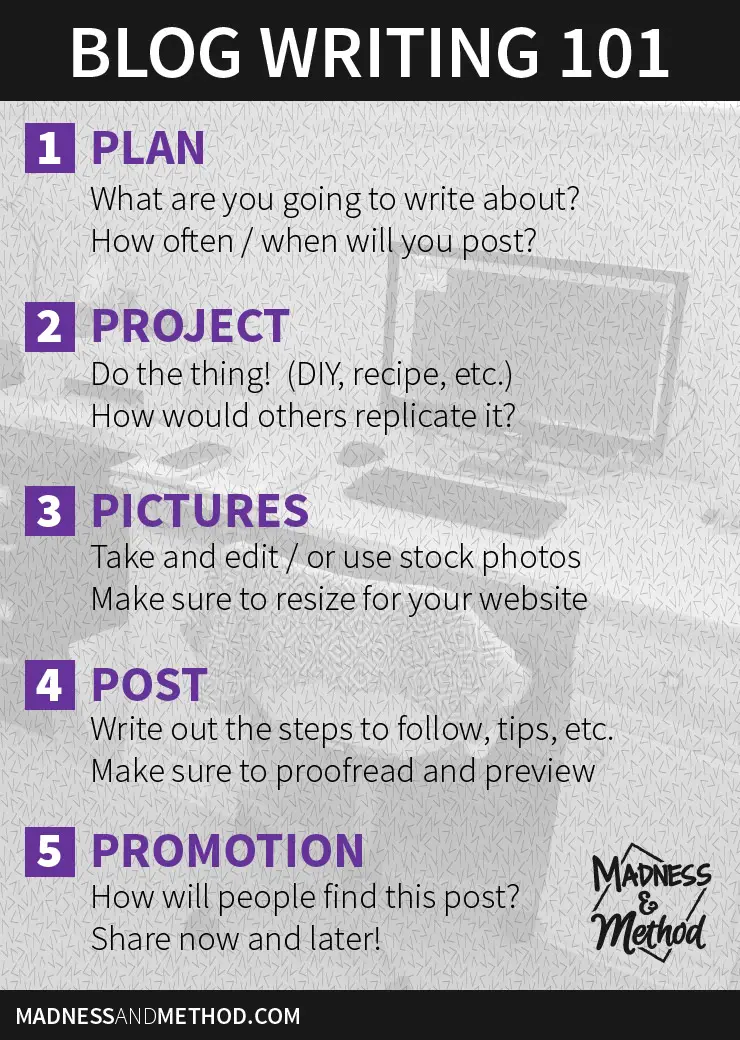
I wrote the main points in this pinnable graphic, and that way you can easily get the info without having to read all my text :) Remember when I mentioned I talk a little too much sometimes? Anyways, I hope this Blog Writing 101 helps you figure out some background info on blogging, and you can definitely research a BUNCH on this topic online. I probably won’t talk too much about blogging in the future, but at least it helps give a bit of insight into how I run things around here!


No Comments