
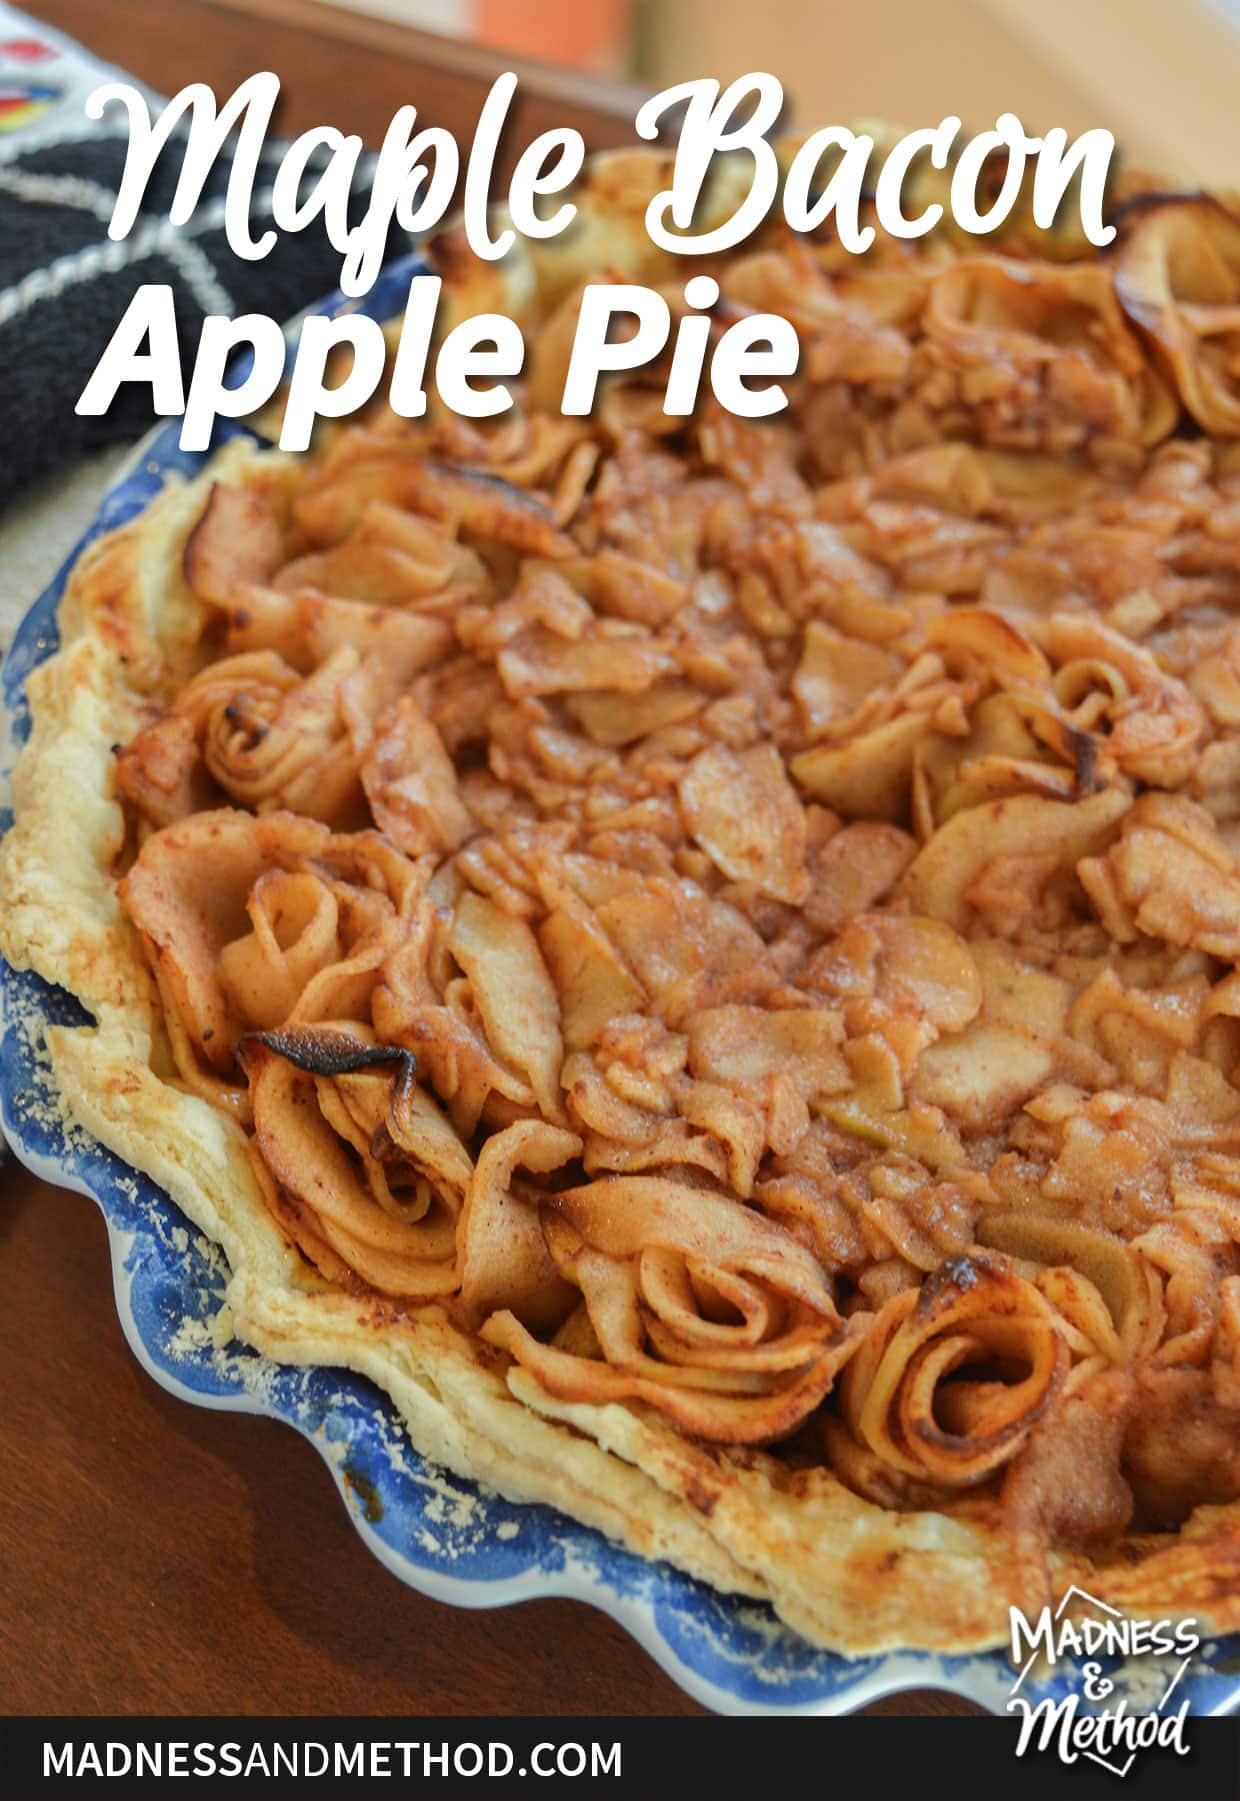
Want to make a stunning-looking pie that tastes good too!? This maple bacon apple pie is the perfect showpiece for your next family gathering, special event, or even just because! I’ve made a similar version of this apple pie a few times, and I thought it would be a good idea to share here :)
Of course, you’ll notice that I assembled the apple slices like roses, but you can certainly make this pie by skipping that step. It would save a lot of time too, but I’ve included the instructions to do it how I did.

With bacon fat in the pie crust, filling, and even in rose-shaped pieces on the top – this is definitely not a pie for people who are vegetarians or vegans. Again, you can take out the bacon to make a normal apple pie.
Prepare Apple Slices
Do you prefer a certain type of apple for your apple pies? For this time, I experimented with using different sizes. The big ones were a little softer than I would have liked.
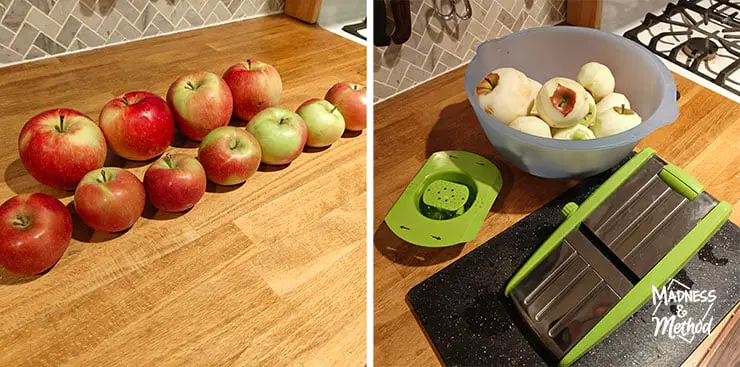
Once the apples are peeled, use a mandoline to slice them thinly. I sliced them at the smallest size (1/8″) but you can always do the next size up too.
You can slice them by hand, but it will take a long time.

For the apples, you want to slice the big side to get nice circles, then swap the guard to hold the apple the opposite way to get more circles. Finally, you can slice the two leftover sides (to get square shapes).
You can keep the pieces separate (in two bowls) or mix together. It’s easier to keep them separate if you’re making rose shapes.
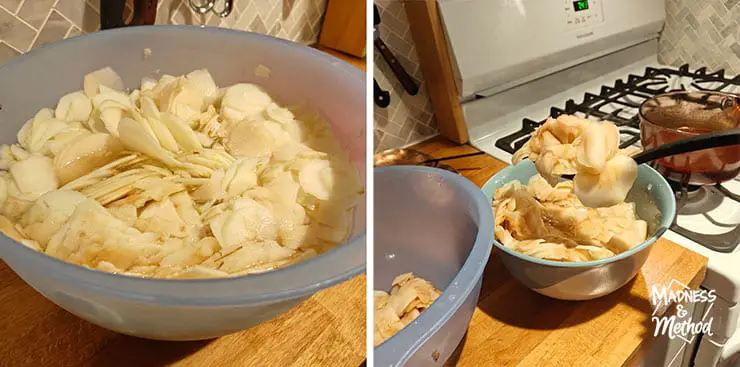
From there, you’ll your bowl with boiling water to pre-soften to apples. Add a tablespoon of lemon juice to prevent them from browning, then you can store them in the fridge until you’re ready for them, or make your apple pie filling.
For the apple pie coating, warm the ingredients on the stove while draining the water from the apples. Once all the water is out, add the warmed coating to the bowl and mix everything together.
You can store your apples with the coating in the fridge until you’re ready to assemble your pie.

Prefer to use a ready-made crust? You can simply fill the apple slices into the crust and bake like that…
But continue reading if you want to know how to make your own bacon fat pie crust and bacon roses :)
Bacon Pie Crust
The only thing you need to make a bacon pie crust compared to a regular pie crust is: bacon fat. I don’t make bacon that often, but whenever I do, I save the bacon fat from the pan and refrigerate it for later.
Aka my maple bacon apple pie :)
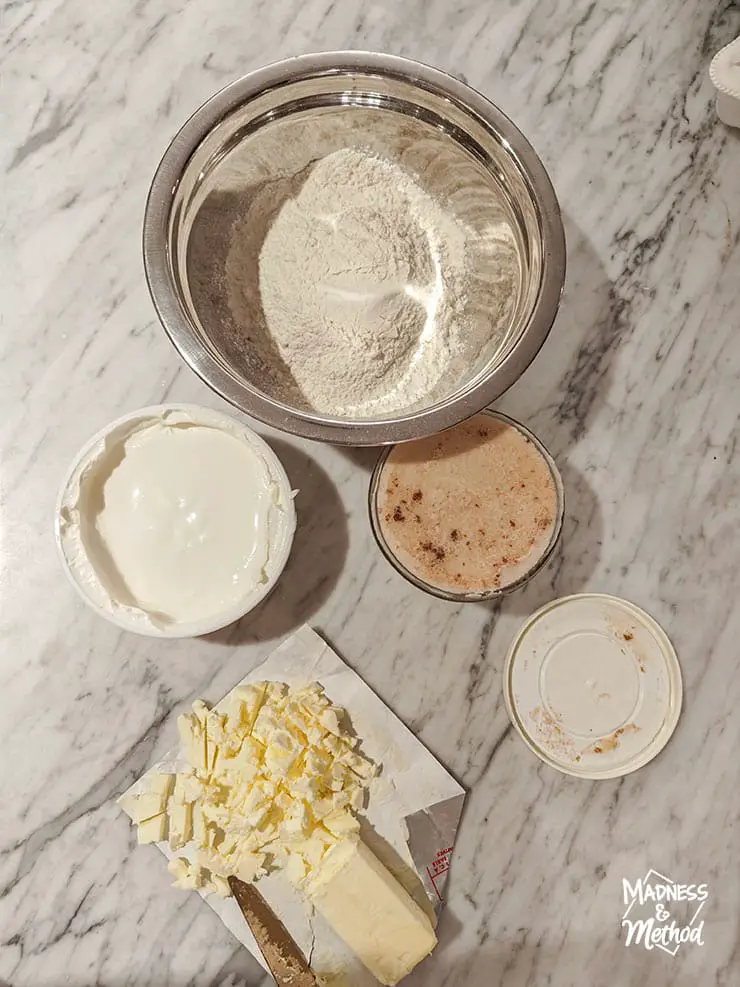
For this crust, you need regular flour (1-1/2 cups), salted butter (1/4 cup – half a stick cut into small pieces), bacon fat (1/4 cup) and sour cream (about 3 tbsp).
Can I tell you a secret? I never make a pie crust with water. I always use sour cream instead and it’s so good!

I mix half of the butter and bacon fat pieces with my fork, then once incorporated, add the rest of the butter and bacon fat. The photo above shows how I add the pieces of bacon fat around the rim then one at a time. That way, it avoids clumping all together.
When all mixed, add a tablespoon of sour cream at a time until it’s crumbly and sticking together.
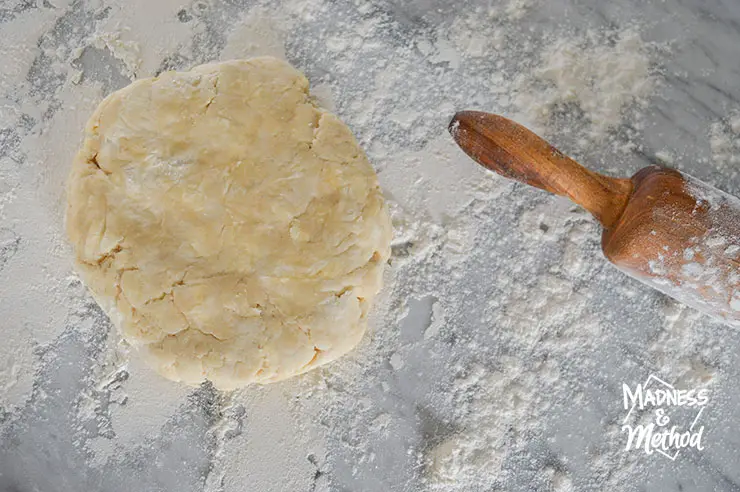
From there you can mold your pie dough into a disk, then cover and refrigerate. I made mine the night before (along with my apple slices) and took them out when I was ready to assemble the pie.
I also par-baked by pie crust this time and it turned out well.
(PS: I did that while I assembled my bacon roses!)

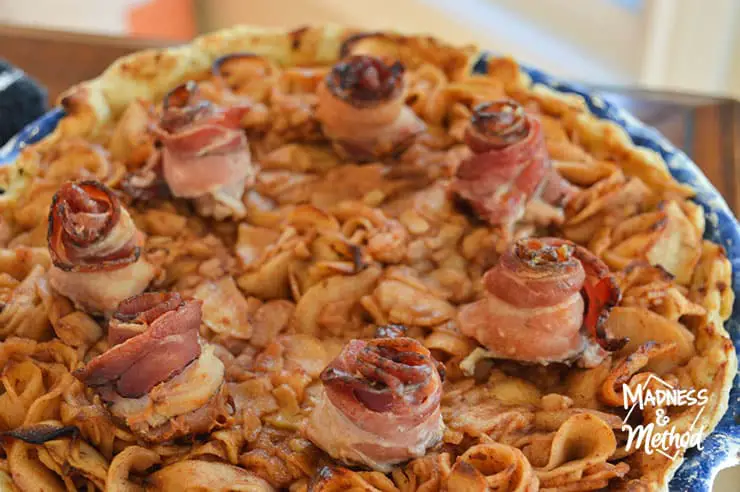
How to Make Bacon Roses
Bacon roses are super easy to make, and they look so fancy!
I used a pack of maple bacon, but any regular cut sliced bacon will work.

Lining a muffin tin with tinfoil, I put on rubber gloves and rolled my bacon around itself. Then you insert toothpicks to the bottom to hold them in place and fold out the edges to look like roses.
You can make mini bacon roses by cutting your bacon strips into four pieces (cut half lengthwise, and half the other way). The mini roses will cook faster, so make sure to take them out of the oven earlier if you have them all on the same tray.
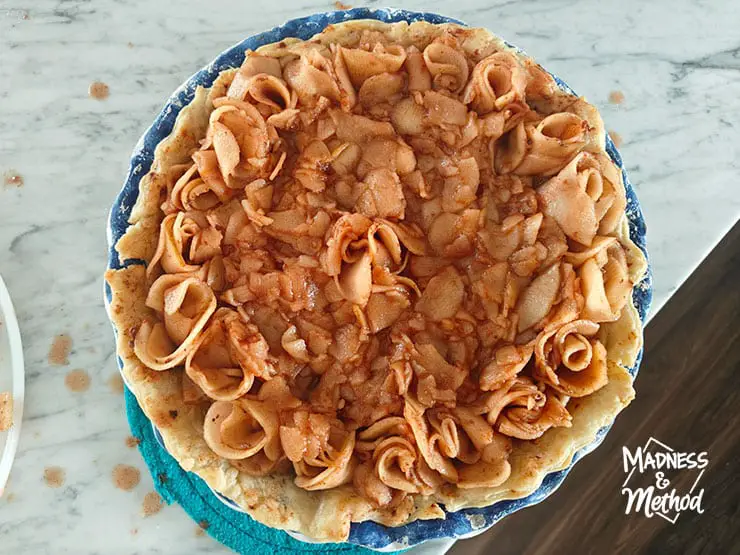
While my bacon was cooking, I started folding my apple slices into flowers. You take the circular apple slices and wrap them around each other, adding pieces until it starts to look like a rose.
For all the square/broken pieces of apples, I first line them at the base of my pie to take up room.
As I mentioned earlier, the big apples I used were way too soft. Maybe I shouldn’t have put them in the boiling water bath, or maybe they were cut too thin, but they fell apart easily. Unfortunately, that meant that I had less slices to use and couldn’t fill the whole pan with roses.
 When I first made this recipe years ago, I used thicker pieces of apples and filled in the whole pan. I think next time I’ll try until thicker slices, or maybe even altering them to get different rose shapes?
Like making bacon roses, making apple roses is definitely more time-consuming then just throwing the apples into the dough.
But it looks so good, right!?
Maple Bacon Apple Pie Recipe
A delicious treat for a Thanksgiving, Christmas, or anytime feast! This full-of-rose-shapes maple bacon apple pie looks and tastes delicious.
Ingredients
- Pie Crust
- 1-1/2 cups all-purpose flour
- 1/4 cup salted butter, cubed/cut
- 1/4 cup bacon fat (chilled bacon grease)
- 3-4 tbsp sour cream
- Filling
- 8-12 apples (+ 1 tbsp lemon juice)
- 1 cup tomato juice
- 1/4 cup bacon fat
- 1/4 cup brown sugar
- 1 tbsp cinnamon
- 1 tsp nutmeg
- 1 tsp ginger
- 1/2 cup maple syrup
- 1 tsp vanilla (or maple extract)
- Bacon Roses
- 12 strips of bacon
- 2 tbsp maple syrup
Instructions
Pie Dough
In a medium mixing bowl, fork mix half the butter and bacon fat into the flour (or pulse in a food processor)
When well-mixed, add the remaining butter and fat, continue again (doing in small batches avoids clumping)
Add sour cream by the tablespoon until dough starts to stick and stays in ball when squished
Hand knead into a disk, wrap in plastic and refrigerate 2+ hours (or overnight)
Filling
Peel apples, then slice thinly using a mandoline (see details in the post)
Place in a large bowl, then cover with boiling water and 1 tbsp lemon juice
Set aside (can be refrigerated overnight)
In a small saucepan, combine rest of ingredients for filling (tomato juice, maple syrup, bacon fat, brown sugar, cinnamon, ginger, nutmeg, extract)
Simmer for five minutes
While simmering, remove water from bowl of apples (scoop with slotted spoon or use colander, etc.)
Pour warm filling onto apples and mix until incorporated
Set aside (can be refrigerated overnight - or until bacon roses are made)
Bacon Roses
Preheat oven to 375°F
Line a muffin tin in aluminum foil
Wearing disposable gloves, rotate a strip of bacon around itself, then insert two toothpicks like an "x" at the base
Turn over the edges of the bacon to look like a rose, continue until all roses have been made and placed in the muffin tin
(Or, make mini roses by cutting bacon into strips of 4 long pieces and inserting one toothpick)
Brush maple syrup on the tops of the bacon and insert into oven
Mini roses bake in 20-25 mins, large roses around 35-45 (watch so they don't burn)
Make Pie
Roll out the pie dough on a cleaned, floured surface, then fill a standard 9" pie pan
Can pre-bake crust for 15-20 mins at 375°F if wanted (I did this while I formed the bacon roses)
Fill half the crust with the "ugly" slices of apples
Wearing clean disposable gloves, use the round apple slices to form a rose shape
When satisfied with the rose size (about 5-6 slices of apple) place it gently into the pie
Continue adding rose-apples to form the perimeter, or fill in the entire pie
Bake for 35-45 minutes until golden and cooked through (watch that the edges of the apples do not burn)
Wait for it to cool a bit to serve, or refrigerate and serve another day!
Notes
The bacon roses are optional, but add a fun touch to the pie! If refrigerating and serving the next day, you can add the bacon roses to the pie while you heat it before serving (at 300°F for about 10-15 minutes)

The big bacon roses look good with the apples, but are logistically harder to eat. Most people would take them off and eat them separate, but it’s still a good chunk of bacon. By contrast, the little roses could be mixed throughout the pie if you want, and eaten at the same time.

So, be honest… would you attempt to make this maple bacon apple pie?! I know the rose-shaped bacon and rose apples in the pie look tricky, but they are simple once you get the hang of them.
And they definitely have that WOW factor!
I’ll also mention that this apple pie is a bit less sweet than a traditional recipe. So, if you don’t like the sickly-sweet filling of a traditional pie but still want something that tastes good, this is a great apple pie recipe to try!
And don’t have/want to use bacon fat? Simply omit it for butter :)


No Comments