
I’m SUPER excited about this post because it’s a simple update that made a big difference in the visual appeal of my brother’s bathroom. Using spray paint I was able to do a dramatic bathroom counter transformation, and I’m going to share the process with you (along with some warnings/disclaimers too).
– Note: This post contains affiliate links. See more information about affiliates here. –
As a reminder, I am updating my brother’s bathroom as a linking participant in the One Room Challenge hosted by Linda of Calling It Home. Twice a year, 20 featured bloggers transform a space in 6 weeks, and other bloggers get to join in on the fun too! I say fun, but of course there is a lot of blood, sweat and tears. Thankfully, I’m a little less crazy ambitious this year, and we decided to do a bathroom makeover rather than build one completely from scratch.
I shared the before pictures and design plan in week 1; and the demolition and progress in week 2. We have a BIG list of things to update (trying to keep as many original things in the room as possible), so I’ll just update everyone on all the new things that have been completed.
AND just to make it a bit more interesting, my brother lives 6+ hours away from me, so we’ve had to get as much done as possible when I go down to visit him.
Here’s what we’ve completed so far:
-
Remove mirror (save to put back up after)Can’t do this - Clean floors
- Paint floors gray
- Fancy floor paint
Reinstall mirror- Paint countertop (+ clear coat seal)
- Clean and paint register
Before we painted, we realized that the mirror was glued to the wall. Because we would be putting it back up in the exact same spot, we decided to keep it up and paint around it. Two less tasks to do :)
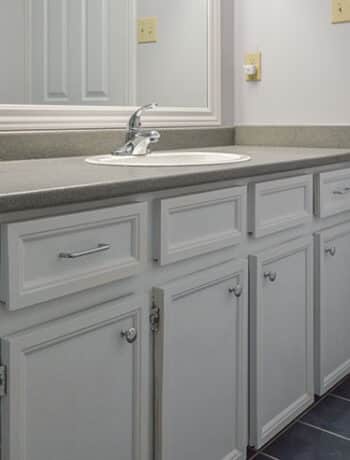
Bathroom Counter Transformation
Today I’ll be highlighting one of my amazing sponsors for this bathroom renovation project. I’ve worked with Krylon on a couple of posts before, and I really wanted to try one of the textured sprays for the counters in my brother’s bathroom. (Check out the other project sponsors highlighted at the bottom of the post!).
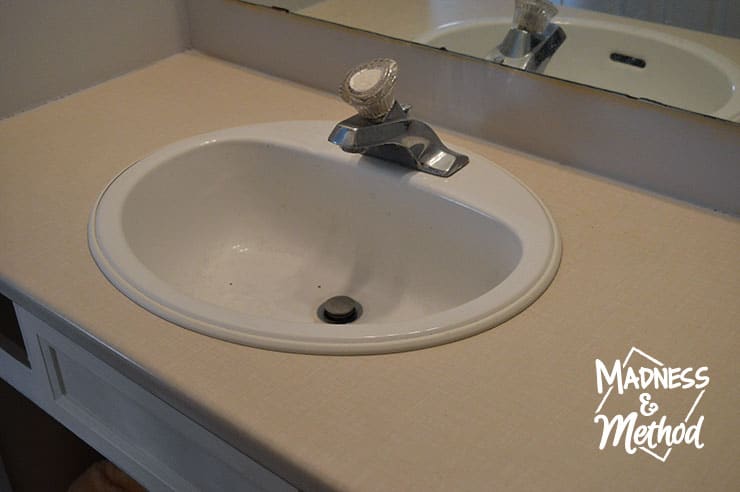
I gave the plain laminate counters a good cleaning and made sure everything was dry. Fun fact: the counters had the exact same pattern/material as the doors on the vanity cabinet…
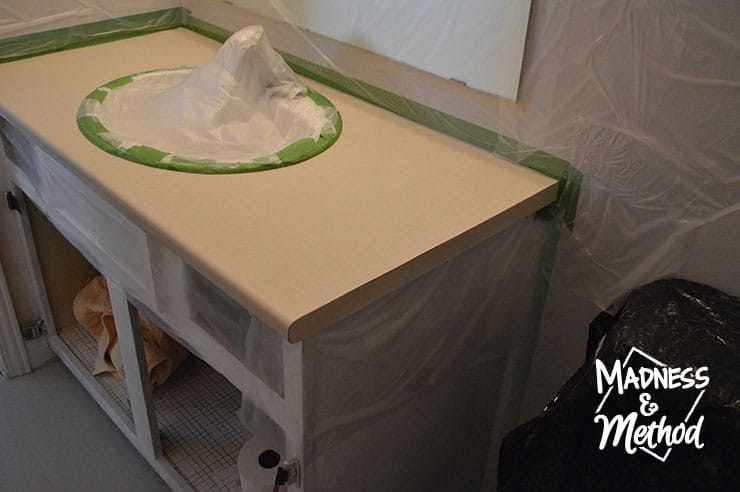
I then taped around the sink and edge of the counter and covered the outside area with my trusty peel and stick. Tip: Make sure the surrounding coverings are also taped at the edges near the counter. I did have some peel/fly up near the edges where I was spraying, and it was much more difficult the tape it once it was covered in paint :)
Materials Required
- Make it Stone! Texture Paint in Black Granite (or here for a bit cheaper)
- Make it Last! Clear Sealer
- Painter’s Tape and plastic to cover areas
- Exacto/Utility knife
- Piece of cardboard to hold
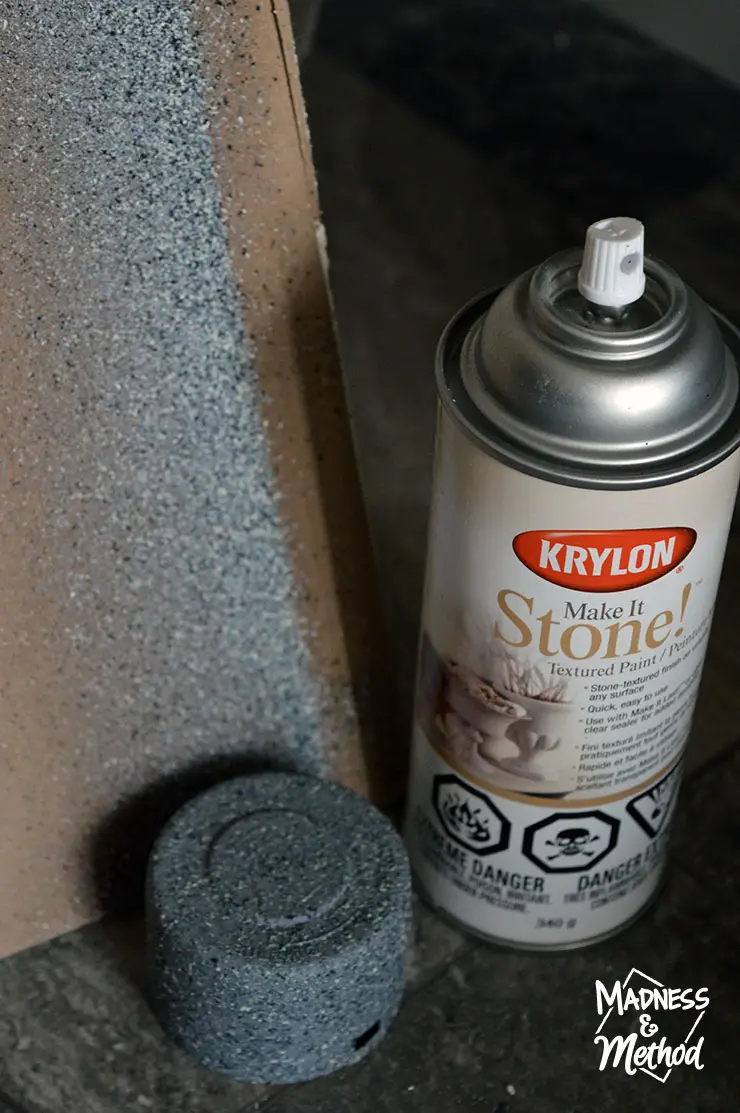
I used Krylon’s Make it Stone! Texture Paint in Black Granite, which is actually a nice medium gray colour. I followed the instructions on the can (only shaking for a few seconds and holding it a bit farther than normal spray paint) and also had a piece of cardboard in my opposite hand to catch any overspray (and by cardboard I mean a random piece of drywall).
Buy Make it Stone! Texture Paint in Black Granite online here or here for a bit cheaper
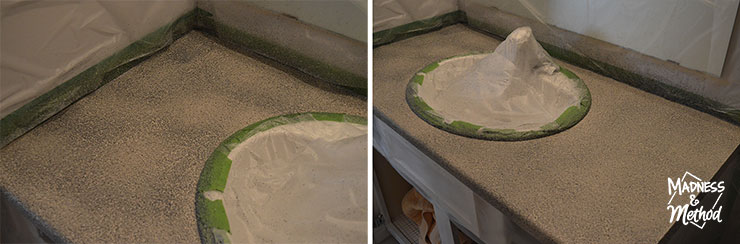
Don’t worry, the first coat isn’t going to be perfect. You’re supposed to do multiple thin coats, and each coat will fill in any patches. You can respray after 15 minutes, but I found it best to wait about 30.
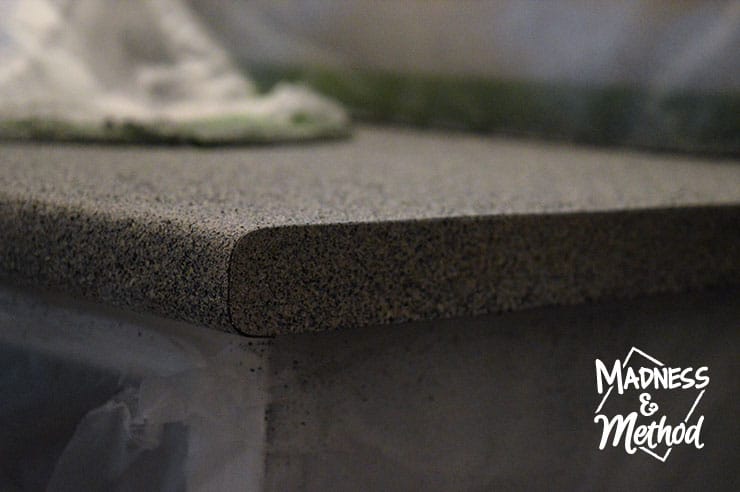
You definitely don’t want to spray too closely, because sometimes it will move your little “stones” around. (I believe the stones are actually just little clumps of paint). I tried to go all around the edge of the counter, but didn’t worry as much on the parts that people wouldn’t see :)
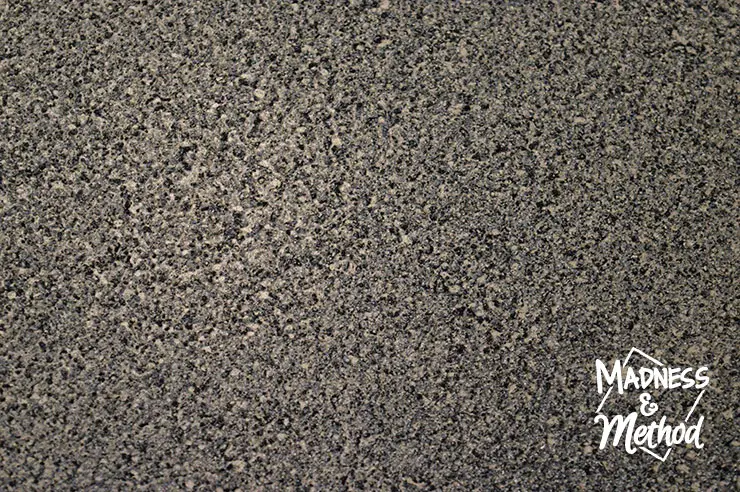
Like the can mentions, you will probably still be able to see a bit of the undercoat (ie: the original beige counter). If you have a super bright surface you’re trying to hide, it might be better to paint it a neutral colour ahead of time.
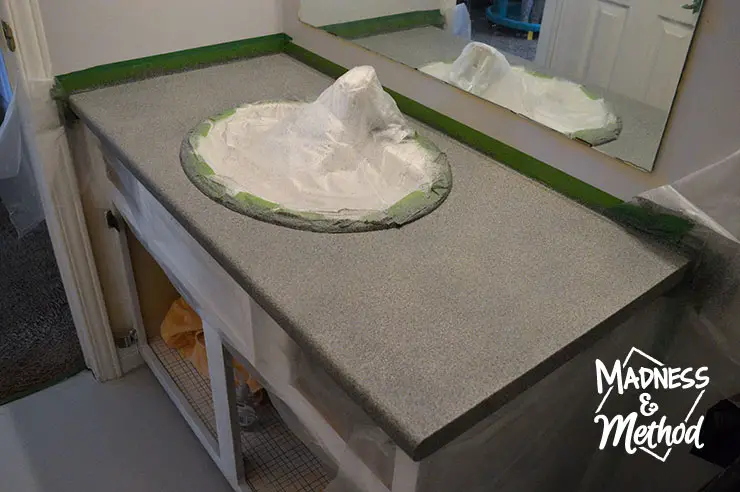
Once you’re happy with the coverage, leave everything dry properly for another 6+ hours. I think I did 3 or 4 coats and let it set overnight (I used one entire can).
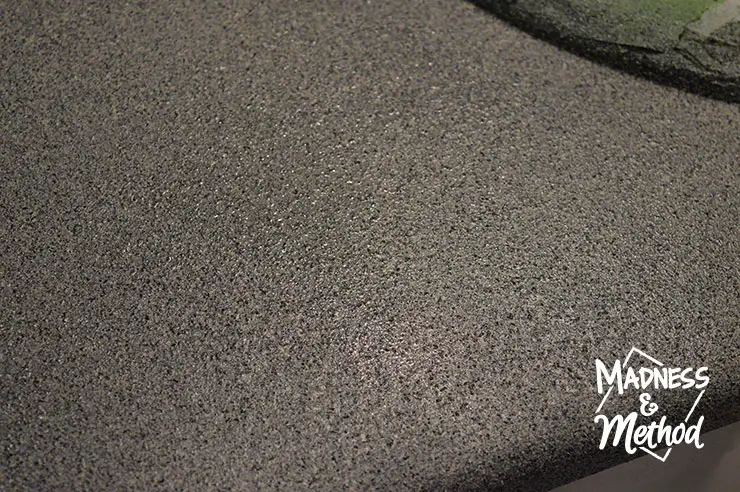
The next day, I gave the counters a few thick coats of the Make it Last! Clear Sealer. I should note that the Make it Stone! Textured Paint didn’t actually smell super strong (more like a regular paint maybe?) but the sealer was more similar to a traditional spray paint. We had windows/doors open and a fan blowing, and it wasn’t too bad.
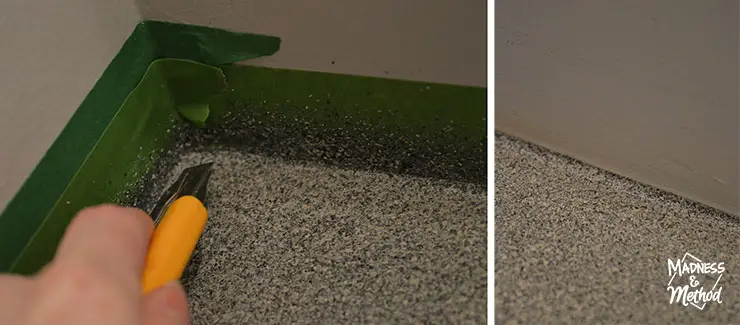
Finally, once that was dry, I removed the painters tape along the edges and carefully peeled everything away. I honestly had more issues with the tape for this project than the paint!
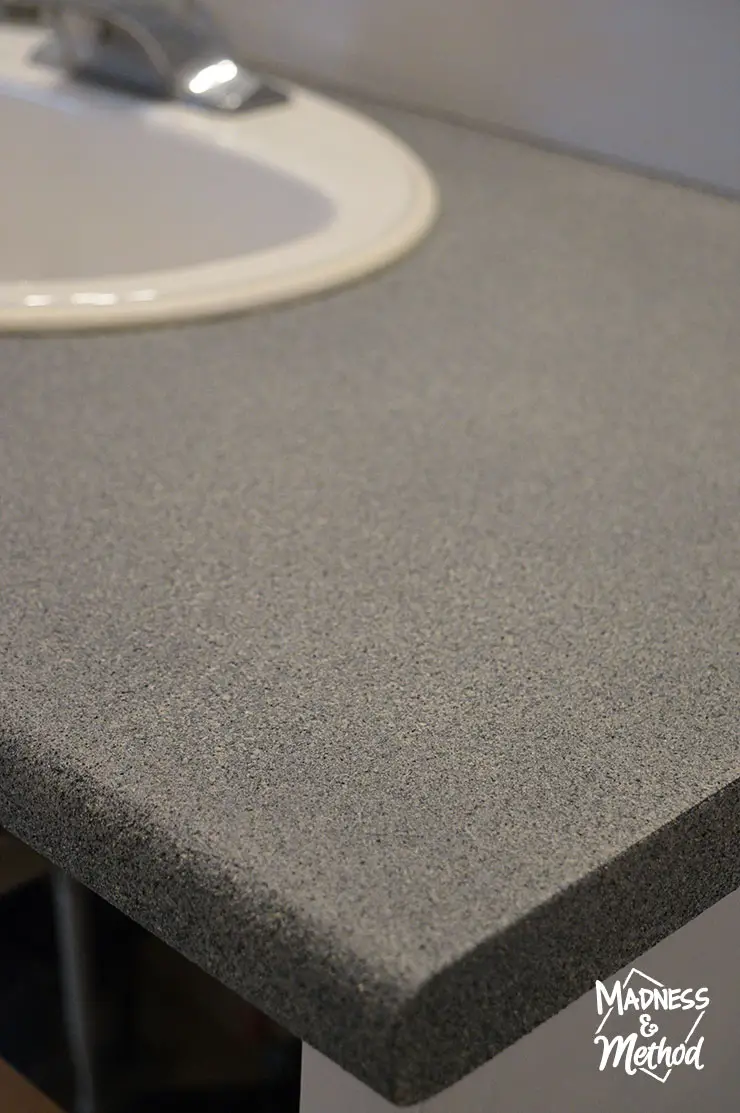
AND IT LOOKS AMAZING! After the second coat I even bumped a small area and exposed the bare counters. I just gave it another extra spray or two and it blended in perfectly.

Seriously, check out the difference! Although the original counters were smooth, you should know that they now feel bumpy (like textured sand). There’s also a Fine Stone Paint available, so I’m thinking that one might be a bit smoother. Anyways, I’m hoping the bathroom counter transformation holds out well (my Dad was worried about deep scrubbing/cleaning) and I will make sure to let you know :)
Buy Krylon Natural Stone paint in Granite here (I think it’s a similar colour)
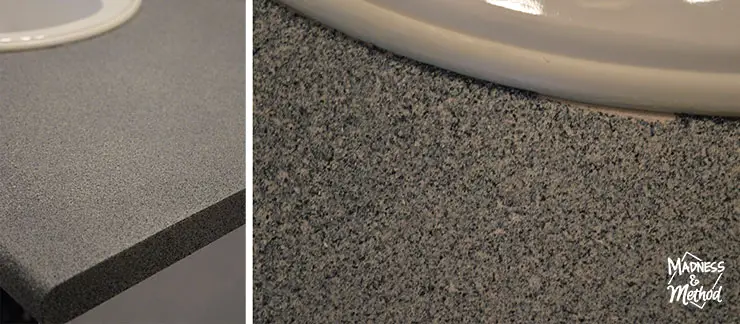
I was able to cover the edge seam almost perfectly, and I just had a spot or two around the sink that didn’t get coated (blame my bad tape job!). To hide the area, I actually went in with a toothpick (I didn’t have my small paintbrushes on hand) and dabbed on some of the floor paint (which is about the same colour). I tried to match the pattern as best as I could, although you could always re-tape (properly) and spray it again.
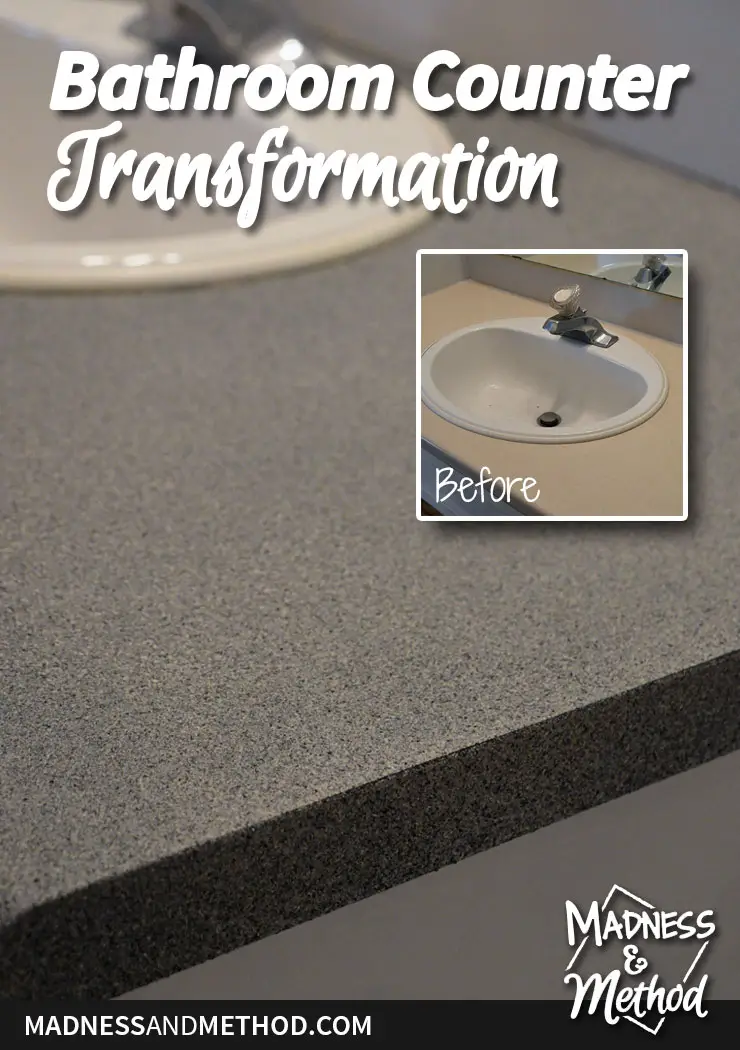
So far, I’m really happy with how the space is turning out, especially now that the bathroom counter transformation is complete. The floors are also looking AMAZING but you’ll have to wait a week or two before I share those :)
We’ve started on a few other tasks but the floors took some time to dry, so we couldn’t be in the room while that was happening. I’m hoping that we can get everything else finished the next time I go down to visit my brother…
So what’s left?
- Cut + install baseboards
- Added: Paint second coat gray on walls
- Tape wall pattern
- Paint wall pattern
- Paint cabinet (started this)
- Install cabinet hardware (purchased!)
- Added: but doors/drawers back on
- Remove old faucet
- Cut + install mirror frame (started this)
- Install new faucet
- Install towel holder
- New light fixture?
- Install prints
- Paint touch-ups
- Added: Install GFCI
Still Undecided/Not Yet Purchased:
- Light fixture
- Accessories
- Frames for prints
- Prints
- Toilet paper stand
And I think we’ll be buying a new light fixture, rather than going with a DIY option. My brother said he doesn’t like the one now (mostly the lightbulbs) and I’ve sent him a bunch of links for options that could work.
We will see what he picks…
PS: Don’t forget to support the other One Room Challenge linking participants (and feature bloggers!) too :)

This Project Has Been Sponsored By:
![]()
![]()
![]()
![]()
20 Comments
Roxanne
April 20, 2017 at 1:36 pmI did not know there was a spray paint for counters, I’d say this is a game changer! Love it, it looks great!
Nicole
April 21, 2017 at 9:10 pmHello Roxanne – technically the spray is for giving a textured finish to craft type projects; but I thought it would make a perfect counter!
Wanda | From House To Home
April 20, 2017 at 2:41 pmHi Nicole…the counter looks amazing! I’ll have to find a project to use that on :) Looking forward to seeing the finished floors.
Nicole
April 21, 2017 at 9:11 pmThanks Wanda, I’m really hoping they last a long time too :) Fingers crossed!
Danielle
April 20, 2017 at 2:55 pmThat counter looks great! I thought you had replaced it! 3 more weeks!
Nicole
April 21, 2017 at 9:12 pmI know, it looks brand new! The last week is going to be a mad rush for sure :)
Angela @ Simply Beautiful By Angela
April 20, 2017 at 3:26 pmWhat an amazing transformation! It looks so much better, I can’t wait to see how your floor turn out :)
Nicole
April 21, 2017 at 9:13 pmI’m really liking the new look, and it will go perfectly with the rest of the updated bathroom!
Jenna
April 20, 2017 at 4:25 pmIs the spray and seal spray non toxic? I’ve always wondered as I wanted to do this last year to down half bath counter top!
Nicole
April 21, 2017 at 9:16 pmBecause it’s a spray paint, it’s not always recommended to spray indoors (although that’s what I did – and I found the stone texture not as strong smelling as the sealer). You can always read the technical details on the Krylon website (I believe I linked to the products in the post). Just make sure to have some windows open and fans running if you can. Another trick I do when I spray indoors (I’m clearly bad at that haha!) is to spray paint right before I’m about to leave somewhere, that way the fumes have a chance to dissipate by the time I get back. Hope that helps!
April R - Uncookie Cutter
April 20, 2017 at 5:48 pmWhoa, isn’t that cool??? Nice work!
Nicole
April 21, 2017 at 9:17 pmI’ve always seen those textured sprays at the store and knew they would make a great counter – here’s hoping it lasts a long time!
CoCo
April 21, 2017 at 1:15 pmHoly moly, I’ve never seen anything like this! So cool and very creative. I bet he’s so excited – this looks really good! Hugs, CoCo
Nicole
April 21, 2017 at 9:18 pmHa, I think my brother will be more excited once everything’s done and I don’t disrupt his life/house anymore! Maybe his visitors will be more impressed :)
Lidia
April 21, 2017 at 11:05 pmWhat a great solution!!! (Adding to my list of must-trys!)
Nicole
April 24, 2017 at 10:57 amHere’s hoping it lasts a long time :)
BonBon
April 25, 2017 at 10:28 amLove how the sink counter turned out. What a transformation. Looking forward to seeing the floor and the progress next week.
Nicole
April 25, 2017 at 1:16 pmThanks BonBon! I’m hoping everything comes together in the end :)
Vickie
February 28, 2020 at 9:39 pmHow well did it hold up after all this time?
Nicole
March 1, 2020 at 7:58 pmI haven’t seen it in a while, but my brother sent me some photos and there are a few wear spots right in front of the sink (where the finish came off and you can see the counter below). In the future, I would paint the counter the same colour so there wouldn’t be as much contrast if it came off, and I’d use a different sealer maybe (something that could brush on?). Hope that helps!